Do You Know How to Arduino?
I had a great day prototyping with new Arduino Duemilanove. Other than the frustaingly long name we got along pretty well!

The board came from SparkFun along with a protoboard -- I didn't get the protoshield yet, but it's only another $16 so it might be a future purchase. Also arriving today was the compact accelerometer breakout board from RobotShop. One box came by snail mail, the other by UPS, so it was quite exciting when they arrived literally within minutes of each other.
The Duemilanove is a great board -- solid components, automatic power switching, plenty of IO, and an upgraded ATmega chip. I'm definitely going to like having the extra storage on board for my new project.
I had to do a lot of fiddling to get the accelerometer to work well, but most of this was software tweaking. The actual circuitry took all of fifteen minutes and the arudino sketch was really fast.
#includevoid setup(){Serial.begin(115200);}void loop(){Serial.print("X");Serial.print(analogRead(2));Serial.print(",Y");Serial.print(analogRead(1));Serial.print(",Z");Serial.print(analogRead(0));Serial.print("|");delay(250);}
There's the arduino code to read three analog values from the accelerometer -- I've pushed them into a format that looks like 'X000,Y000,Z000|' for ease of parsing. The code sets up the serial communications at 115200, a common speed for PC work.
If you're hooking your board up to say a BASIC stamp or other board, the speed will typically be 9600baud. This is simple - just change the setup code to say Serial.begin(9600);.
So, back to the filtering issues -- the Arduino board runs at 5V, so it expects an analog pin to input between 0 to 5V. The accelerometer outputs from 0 to 3.3V, so it effectively loses 33% of the full range of the arduino pin.
Arduino outputs a signal (when it reads the pin) between 0 and 1024. For an accelerometer, 0 means full negative acceleration, while 1024 means full positive accleration. What "Full" means varies on your accelerometer sensitivity range. Mine is adjustable from +/-1.5g to +/-6g (g==multiples of gravity, i.e. 9.81m/s^2).
To graph the data I needed to scale my output == instead of 1024 being max, 675 was the new maximum; 0 stayed the same. There was also a dropout issue where the signal would drop to full negative (0V, 0 output) every few seconds. This was determined to be a software issue, so I simply discarded any input that matched this characteristic.
It's pretty trivial in most langauges to set up a serial port monitor -- you can also simply use the serial port monitor right in the Arduino IDE, but you can't do anything except watch the raw data scan by....pretty useless for actual work, but great for debugging.

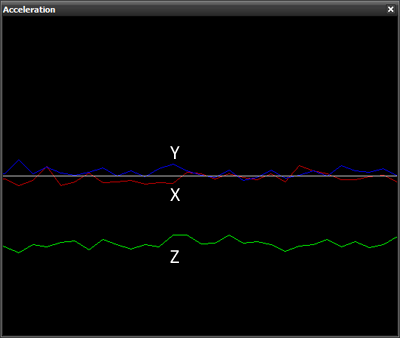
I consider myself a visual learner, and assuming you're the same -- here's the final accelerometer data. The green is the Z axis, red == X axis, and blue == Y axis. The X and Y axis average to around zero, which is good == the board was level and stationary. The green axis is hovering below the rest...do you know why?
Yep, we still haven't figured out how to turn gravity off. I think that's a good thing! If we're properly calibrated, the Z axis will be registering an average of 1g when standing still.
Well, I'm off to prototype more stuff! Now to try a Sharp IR rangefinder and some more serial data transfer using the digitial pins (0 & 1).
Labels: arduino, cmu robotics club, microcontroller, robot
 Subscribe to DanShope.com