Designing & Testing Robots: Colony Scout
Colony Scout Updated Design
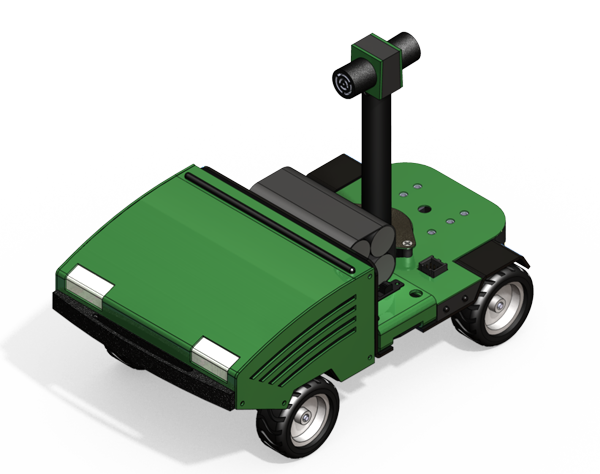
Between classes, eating, and sometimes sleeping I've been hard at work refining the Colony Scout robot. The core feature set has remained the same -- four wheel drive, rocker pivot platform powered by a lithium ion pack. The sensor package includes a front bumper, dual sonar rangefinders, battery level monitoring, localization beacons, xbee communications, wheel encoders, yaw gyroscope, and three axis accelerometer.
Shown here in green (one of many colors), the Scout now sports a vented enclosure for the electronics. RGB (multicolor) LED "headlights" shine out the front hood, which is magnetically clasped for easy access to the processing board.

The team has been hard at work designing the Scout board, which runs an ARM9 core mated to an ATmega 128A as a coprocessor. The ARM9 does the heavy lifting but leaves the very important role of gathering sensor data and driving the motors to the lower powered AVR chip.
Board design is custom and includes components specific to the platform. We are looking into POE (power over ethernet), USB, and external charging to power the system.
Scout will run a Linux RTOS -- as yet to be decided. Linux brings a lot of functionality to the table but also has its own quirks that will be interesting during development and testing. We hope to have a first run dev board in testing by December.
Diagnostic Station
Testing and validating the robot design only goes as far as production. The diagnostic station aids the maintenance process over the lifetime of the robot(s).
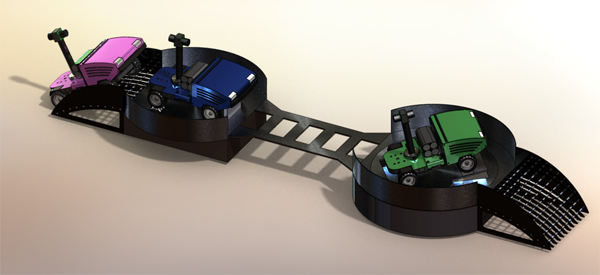
I went for a pipelined design whereby tests are separated spatially to allow faster throughput with multiple robots. This results in an elongated testing platform, but it still measures in under a yard...so far :-)
Assuming the robot can navigate to the station, it will ascend the ramp and proceed through the three stages. All tests and robot maneuvers are controlled by the Colony server, which handles scheduling and task assignments for all the robots.

Stage 1: Chassis Dyno & rBOM Tester
The motors and encoders are tested across the speed range of the robot. A sequence of tests is also performed with loading on the dyno rollers. This simulates the robot driving across different terrains.
Stage 2: Cliff Bridge
Between the two larger stations, the bridge tests the three cliff sensors through several cycles (see ladder-like design). This comes after the encoders/motors are calibrated for straight line driving. We don't want robots to go splat during a maintenance run!
Stage 3: Gyro & Accelerometer Station
The final and most complex station latches onto the robot and spins it for gyro testing. Accelerometer tests are also performed by spinning and tilting the robot. I'm still designing the internal mechanisms -- should be interesting.
Dyno Station Mock up (who doesn't love Legos(R)?)
Other News
I've also been working on the design and function of the charging station. So far it's pretty sweet with a low profile, modular design. I'll try to post some renders and details up soon!
Labels: cmu robotics club, colony, colony scout, diagnostics, news, robotics, sonar, swarm robotics, testing
blog comments powered by Disqus Subscribe to DanShope.com